Korean Typing Practice Part 2
This post is part of a series documenting the processes of building a web app to practice typing in Korean.
- Part 1: Generating random “words” from a given input
- This post: Building the screen keyboard and basic UI
- Part 3: Porting sentence generation code from Python to JavaScript and testing it
- Part 4: Handling text as keys are pressed: Hangul vs Latin alphabet edition
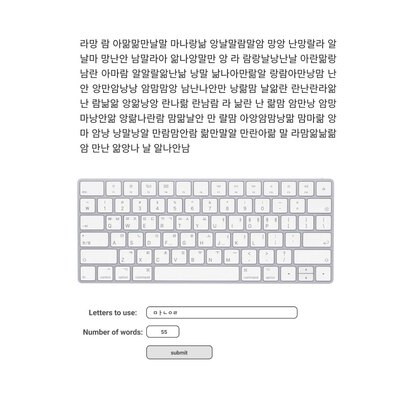
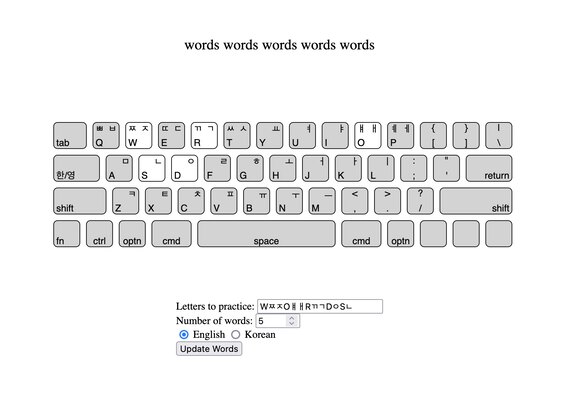
By the end of the last post, I had made a Python Flask app with a URL endpoint that takes a language, some letters, and a number and produces that many random “words” made from the letters provided. In this post, I make the following front end that uses that endpoint:
Design Goals
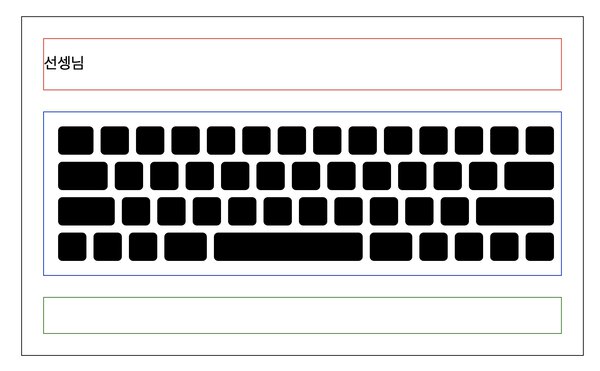
Many of the keyboard practice websites like keybr, Typing Club, and Typing Mentor have similar layouts and this web app will be no different. I made a quick mockup using a photo of an Apple keyboard:
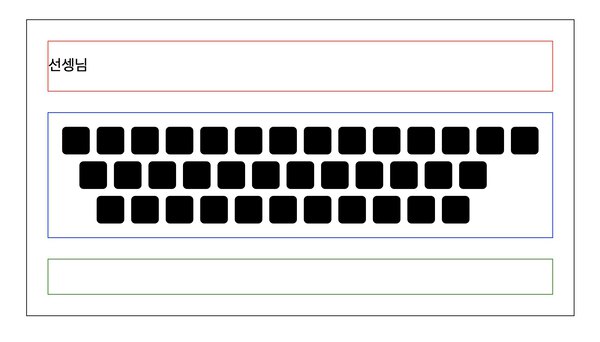
This design has three main elements:
- an area for random words to appear that I will eventually type
- a visual keyboard showing me which keys I’m typing
- a form with some settings
To get started, I’d like to get a page showing up with outlines of the three areas using css grid. I’m going to treat this front end as a new Flask app, then will modify and bring in the code from part 1 at the end.
File Structure
.
├── static
│   └── style.css
├── templates
│   └── app.html
└── app.py
app.py
from flask import Flask, render_template

app = Flask(__name__)

@app.route('/')
def main_page():
    return render_template("app.html")
style.css
.grid-container {
    display: grid;
    grid-template-areas: "header main footer";
    grid-template-columns: auto 50px auto;
    justify-items: center
    }

.main {
    margin: 40px;
    grid-area: main;
    min-width: 600px;
    max-width: 1040px;
    border: 1px solid black;
}

.word-typing-area {
    margin: 30px;
    width: 630px;
    min-height: 50px;
    border: 1px solid red;
}

.keyboard {
    margin: 30px;
    width: 630px;
    min-height: 50px;
    border: 1px solid blue;
}

.letter-selection {
    margin: 30px;
    width: 630px;
    min-height: 50px;
    border: 1px solid green;
}
app.html
<html>
    <head>
    <link rel="stylesheet" href='/static/style.css' />
    </head>

    <body class="grid-container">
        <div class="main">
            <div class="word-typing-area" id="word-typing-area">
            </div>

            <div class="keyboard" id="keyboard">
            </div>

            <div class="letter-selection">
            </div>
        </div>
    </body>
</html>
With that, we have a working page with borders that we can add to:

For those following along at home, I’m still using flask run to serve the site locally, but I changed the bindings in my conda environment files to use app.py.
Building the Keyboard
For now, I’m going to skip over the top section. I’ll put in some mock data in the word typing area (which will eventually be populated with random words) and for now I will focus on making the keyboard.
I want to programmatically make the shapes and place the letters in the correct locations. To do this, I’m going to use svg tags because I’m already a little familiar with how they work.
To start, I know roughly how many keys of the same shape I’m going to need if I want to cover all of the letters and most punctuation: 13 keys on the top row, 11 in the middle row, and 10 on the bottom row.
I went with an approach that would make it easy to adjust the size of the keys later. You set the size of the square keys, then everything else (other keys, spacing between keys, etc) is based off that. Each key is positioned with svg’s x and y coordinates. The start variables give a little bit of padding, the gutter is the space between each key, and the interval is just a convenience variable to use in the keyboard creation loop that makes for tidier code when placing the keys. This approach works really well for keys of all the same size.
keyboard.py
def build_keyboard():
    svg_lines = []
    base_key_size = 40

    x_start = base_key_size//2
    x_gutter = base_key_size//4
    x_increment = base_key_size + x_gutter
    y_start = base_key_size//2
    y_gutter = base_key_size//4
    y_increment = base_key_size + y_gutter

    corner_rounding = base_key_size // 6

    # Create svg and put squares inside
    svg_lines.append(f'<svg id="keyboard-svg" width="{(x_increment * 14 + x_start*2 - x_gutter)}" '
                     f'height="{(x_increment *3 + y_start*2 - y_gutter)}" version="1.1" '
                    f'xmlns="http://www.w3.org/2000/svg">')

    # first row square keys
    for i in range(14):
        svg_lines.append(f'<rect class="key" id="key0-{i}-sq" '
                         f'x="{x_start + ((x_increment//2) * 0) + (x_increment * i)}" '
                         f'y="{y_start + y_increment * 0}" rx="{corner_rounding}" '
                         f'ry="{corner_rounding}" width="{base_key_size}" '
                         f'height="{base_key_size}"/>')

    # second row
    for i in range(12):
        svg_lines.append(f'<rect class="key" id="key1-{i}-sq" '
                         f'x="{x_start + ((x_increment//2) * 1) + (x_increment * i)}" '
                         f'y="{y_start + y_increment * 1}" rx="{corner_rounding}" '
                         f'ry="{corner_rounding}" width="{base_key_size}" '
                         f'height="{base_key_size}"/>')

    # third row
    for i in range(11):
        svg_lines.append(f'<rect class="key" id="key2-{i}-sq" '
                         f'x="{x_start + ((x_increment//2) * 2) + (x_increment * i)}" '
                         f'y="{y_start + y_increment * 2}" rx="{corner_rounding}" '
                         f'ry="{corner_rounding}" width="{base_key_size}" '
                         f'height="{base_key_size}"/>')

    svg_lines.append('</svg>')

    return "\n".join(svg_lines)
app.py
from flask import Flask, render_template
from keyboard import build_keyboard
app = Flask(__name__)

@app.route('/')
def main_page():
    keyboard = build_keyboard()
    return render_template("app.html", keyboard=keyboard)
app.html
<html>
    <head>
    <link rel="stylesheet" href='/static/style.css' />
    </head>

    <body class="grid-container">
        <div class="main">
            <div class="word-typing-area" id="word-typing-area">
                <p>선셍님</p>
            </div>

            <div class="keyboard" id="keyboard">

            </div>

            <div class="letter-selection">
            </div>
        </div>
    </body>
</html>
Next, I want to add a spacebar, and I’m pretty sure I’ll want to have shift in there too, so I might as well add tab, capslock, return, and the one punctuation I left out. To do that, this code needs a little bit of tweaking.
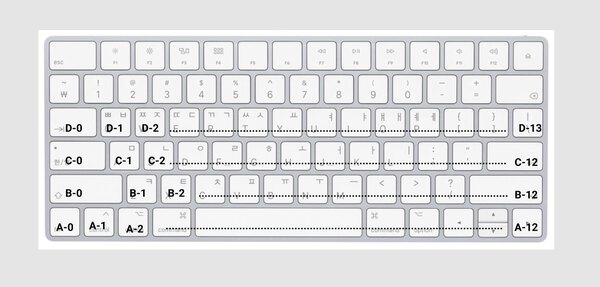
Ideally, I’ll have a system or really clean abstraction for keys that can take a list or dict of information about them and generate the correct svgs. One way would be to make a dict that has all of the keys based on a key index and their sizes. The key indexes are labeled by row and column; I’ve adopted the row lettering (starting with A for the bottom row going up) from the W3 KeyboardEvent code values and the columns (which I know aren’t REALLY columns on a standard keyboard) are numbered starting with 0. I do also use number row identifiers that are more helpful for placing the SVGs such that row 0 is the top row of keys and row 3 is the bottom row of keys. At some point, it may be helpful to refine the keyboard generating code into something a little more standard, but this works fine for now.
This method of using a list allows for easily changing the size relative to a square key:
def build_keyboard():
    svg_lines = []
    base_key_size = 40

    x_start = base_key_size//2
    x_gutter = base_key_size//4
    x_increment = base_key_size + x_gutter
    y_start = base_key_size//2
    y_gutter = base_key_size//4
    y_increment = base_key_size + y_gutter

    corner_rounding = base_key_size // 6

 dict_of_keys = {
        "D0": {"row": 0, "col": 0, "size": base_key_size * 1.25},
        "D1": {"row": 0, "col": 1, "size": base_key_size},
        "D2": {"row": 0, "col": 2, "size": base_key_size},
        "D3": {"row": 0, "col": 3, "size": base_key_size},
        "D4": {"row": 0, "col": 4, "size": base_key_size},
        "D5": {"row": 0, "col": 5, "size": base_key_size},
        "D6": {"row": 0, "col": 6, "size": base_key_size},
        "D7": {"row": 0, "col": 7, "size": base_key_size},
        "D8": {"row": 0, "col": 8, "size": base_key_size},
        "D9": {"row": 0, "col": 9, "size": base_key_size},
        "D10": {"row": 0, "col": 10, "size": base_key_size},
        "D11": {"row": 0, "col": 11, "size": base_key_size},
        "D12": {"row": 0, "col": 12, "size": base_key_size},
        "D13": {"row": 0, "col": 13, "size": base_key_size},

        "C0": {"row": 1, "col": 0, "size": base_key_size * 1.75},
        "C1": {"row": 1, "col": 1, "size": base_key_size},
        "C2": {"row": 1, "col": 2, "size": base_key_size},
        "C3": {"row": 1, "col": 3, "size": base_key_size},
        "C4": {"row": 1, "col": 4, "size": base_key_size},
        "C5": {"row": 1, "col": 5, "size": base_key_size},
        "C6": {"row": 1, "col": 6, "size": base_key_size},
        "C7": {"row": 1, "col": 7, "size": base_key_size},
        "C8": {"row": 1, "col": 8, "size": base_key_size},
        "C9": {"row": 1, "col": 9, "size": base_key_size},
        "C10": {"row": 1, "col": 10, "size": base_key_size},
        "C11": {"row": 1, "col": 11, "size": base_key_size},
        "C12": {"row": 1, "col": 12, "size": base_key_size * 1.75},

        "B0": {"row": 2, "col": 0, "size": base_key_size * 2},
        "B1": {"row": 2, "col": 1, "size": base_key_size},
        "B2": {"row": 2, "col": 2, "size": base_key_size},
        "B3": {"row": 2, "col": 3, "size": base_key_size},
        "B4": {"row": 2, "col": 4, "size": base_key_size},
        "B5": {"row": 2, "col": 5, "size": base_key_size},
        "B6": {"row": 2, "col": 6, "size": base_key_size},
        "B7": {"row": 2, "col": 7, "size": base_key_size},
        "B8": {"row": 2, "col": 8, "size": base_key_size},
        "B9": {"row": 2, "col": 9, "size": base_key_size},
        "B10": {"row": 2, "col": 10, "size": base_key_size},
        "B11": {"row": 2, "col": 11, "size": base_key_size * 2.75},

        "A0": {"row": 3, "col": 0, "size": base_key_size},
        "A1": {"row": 3, "col": 1, "size": base_key_size},
        "A2": {"row": 3, "col": 2, "size": base_key_size},
        "A3": {"row": 3, "col": 3, "size": base_key_size * 1.5},
        "A4": {"row": 3, "col": 4, "size": base_key_size * 5.25},
        "A5": {"row": 3, "col": 5, "size": base_key_size * 1.5},
        "A6": {"row": 3, "col": 6, "size": base_key_size},
        "A7": {"row": 3, "col": 7, "size": base_key_size},
        "A8": {"row": 3, "col": 8, "size": base_key_size},
        "A9": {"row": 3, "col": 9, "size": base_key_size},
    }

    # Create svg and put squares inside
    svg_lines.append(f'<svg id="keyboard-svg" width="{(x_increment * 14 + x_start*2 - x_gutter)}" '
                     f'height="{(x_increment * 4 + y_start*2 - y_gutter)}" version="1.1" '
                    f'xmlns="http://www.w3.org/2000/svg">')

    current_row = -1
    for item in dict_of_keys:
        key_key = dict_of_keys[item]
        if key_key["row"] > current_row:
            x = x_start
            current_row = key_key["row"]

        # save key location for later reference
        key_key["xloc"] = x
        key_key["yloc"] = y_start + y_increment * key_key["row"]

        svg_lines.append(f'<rect class="key" id="key{key_key["row"]}-{key_key["col"]}" '
                    f'x="{x}" '
                    f'y="{y_start + y_increment * key_key["row"]}" rx="{corner_rounding}" '
                    f'ry="{corner_rounding}" '
                    f'width="{key_key["size"]}" '
                    f'height="{base_key_size}"/>')
        x += key_key['size'] + x_gutter

    # Code for adding letters to the keys will go here

    svg_lines.append('</svg>')

    return "\n".join(svg_lines)
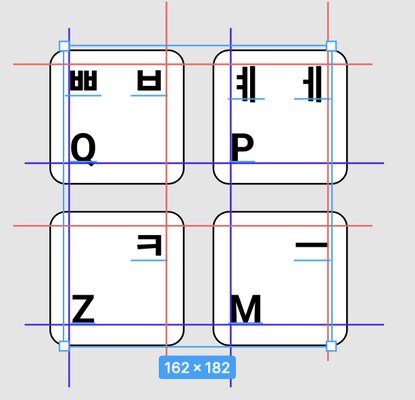
Now to add the labels,
Now that the keys are in place, I want to add the text for each key. This can end up being a little tricky because letters (in English and Korean) and punctuation marks aren’t always the same width or height. The image below shows for example keys from a drawing in Figma. I’ve drawn some lines representing where I’d ideally like to align each item. I believe Figma is also showing where each character’s baseline is in blue under each character. Notice that most capital English baselines are near the bottom of the character, but that the tail on the Q goes below the baseline. Also notice where the baselines are for the Korean characters relative to the character itself: some are above and some are below.
Each letter will need to be placed on the keyboard in the correct location (which is why I saved the x and y locations in the key dictionary). Knowing where the key’s x and y locations are mean that the letter can be placed in relation to the key edges. Each letter will be aligned either to the top or the bottom of the key and aligned either to the left or right edge. I made one dictionary with each letter, it’s key index (A0, B1, C2, etc.), language, and relative position. Then I separately calculated the way they would be aligned. In this case, I’m using the ‘dominant-baseline’ and ‘text_anchor’ to shift the placement up, down, left and right.
    # # Add letters to squares
    dict_of_letter_positions = {
        'tab': {'key_index': "D0", 'lang': 'EN', 'col': 1, 'row': 0, 'position': 'lower_left'},
        'Q': {'key_index': "D1", 'lang': 'EN', 'position': 'lower_left'},
        'W': {'key_index': "D2", 'lang': 'EN', 'position': 'lower_left'},
        'E': {'key_index': "D3", 'lang': 'EN', 'position': 'lower_left'},
        'R': {'key_index': "D4", 'lang': 'EN', 'position': 'lower_left'},
        'T': {'key_index': "D5", 'lang': 'EN', 'position': 'lower_left'},
        'Y': {'key_index': "D6", 'lang': 'EN', 'position': 'lower_left'},
        'U': {'key_index': "D7", 'lang': 'EN', 'position': 'lower_left'},
        'I': {'key_index': "D8", 'lang': 'EN', 'position': 'lower_left'},
        'O': {'key_index': "D9", 'lang': 'EN', 'position': 'lower_left'},
        'P': {'key_index': "D10", 'lang': 'EN', 'position': 'lower_left'},
        '{': {'key_index': "D11", 'lang': 'EN', 'position': 'upper_xcenter'},
        '[': {'key_index': "D11", 'lang': 'EN', 'position': 'lower_xcenter'},
        '}': {'key_index': "D12", 'lang': 'EN', 'position': 'upper_xcenter'},
        ']': {'key_index': "D12", 'lang': 'EN', 'position': 'lower_xcenter'},
        '\\': {'key_index': "D13", 'lang': 'EN', 'position': 'lower_xcenter'},
        '|': {'key_index': "D13", 'lang': 'EN', 'position': 'upper_xcenter'},

        '한/영': {'key_index': "C0", 'lang': 'EN',  'position': 'lower_left'},
        'A': {'key_index': "C1", 'lang': 'EN', 'position': 'lower_left'},
        'S': {'key_index': "C2", 'lang': 'EN', 'position': 'lower_left'},
        'D': {'key_index': "C3", 'lang': 'EN', 'position': 'lower_left'},
        'F': {'key_index': "C4", 'lang': 'EN', 'position': 'lower_left'},
        'G': {'key_index': "C5", 'lang': 'EN', 'position': 'lower_left'},
        'H': {'key_index': "C6", 'lang': 'EN', 'position': 'lower_left'},
        'J': {'key_index': "C7", 'lang': 'EN', 'position': 'lower_left'},
        'K': {'key_index': "C8", 'lang': 'EN', 'position': 'lower_left'},
        'L': {'key_index': "C9", 'lang': 'EN', 'position': 'lower_left'},
        ';': {'key_index': "C10", 'lang': 'EN', 'position': 'lower_xcenter'},
        ':': {'key_index': "C10", 'lang': 'EN', 'position': 'upper_xcenter'},
        '"': {'key_index': "C11", 'lang': 'EN', 'position': 'upper_xcenter'},
        "'": {'key_index': "C11", 'lang': 'EN', 'position': 'lower_xcenter'},
        "return" : {'key_index': "C12", 'lang': 'EN', 'position': 'lower_right'},

        "lshift": {'key_index': "B0", 'lang': 'EN', 'position': 'lower_left'},
        'Z': {'key_index': "B1", 'lang': 'EN', 'position': 'lower_left'},
        'X': {'key_index': "B2", 'lang': 'EN', 'position': 'lower_left'},
        'C': {'key_index': "B3", 'lang': 'EN', 'position': 'lower_left'},
        'V': {'key_index': "B4", 'lang': 'EN', 'position': 'lower_left'},
        'B': {'key_index': "B5", 'lang': 'EN', 'position': 'lower_left'},
        'N': {'key_index': "B6", 'lang': 'EN', 'position': 'lower_left'},
        'M': {'key_index': "B7", 'lang': 'EN', 'position': 'lower_left'},
        ',': {'key_index': "B8", 'lang': 'EN', 'position': 'lower_xcenter'},
        '<': {'key_index': "B8", 'lang': 'EN', 'position': 'upper_xcenter'},
        '.': {'key_index': "B9", 'lang': 'EN', 'position': 'lower_xcenter'},
        '>': {'key_index': "B9", 'lang': 'EN', 'position': 'upper_xcenter'},
        '?': {'key_index': "B10", 'lang': 'EN', 'position': 'upper_xcenter'},
        '/': {'key_index': "B10", 'lang': 'EN', 'position': 'lower_xcenter'},
        "rshift": {'key_index': "B11", 'lang': 'EN', 'position': 'lower_right'},

        "lfn": {'key_index': "A0", 'lang': 'EN', 'position': 'lower_left'},
        "lctrl": {'key_index': "A1", 'lang': 'EN', 'position': 'lower_xcenter'},
        "loptn": {'key_index': "A2", 'lang': 'EN', 'position': 'lower_xcenter'},
        "lcmd": {'key_index': "A3", 'lang': 'EN', 'position': 'lower_xcenter'},
        "space": {'key_index': "A4", 'lang': 'EN', 'position': 'lower_xcenter'},
        "rcnd": {'key_index': "A5", 'lang': 'EN', 'position': 'lower_xcenter'},
        "roptn": {'key_index': "A6", 'lang': 'EN', 'position': 'lower_xcenter'},

        'ㅃ': {'key_index': "D1", 'lang': 'KO', 'position': 'upper_left'},
        'ㅉ': {'key_index': "D2", 'lang': 'KO', 'position': 'upper_left'},
        'ㄸ': {'key_index': "D3", 'lang': 'KO', 'position': 'upper_left'},
        'ㄲ': {'key_index': "D4", 'lang': 'KO', 'position': 'upper_left'},
        'ㅆ': {'key_index': "D5", 'lang': 'KO', 'position': 'upper_left'},
        'ㅒ': {'key_index': "D9", 'lang': 'KO', 'position': 'upper_left'},
        'ㅖ': {'key_index': "D10", 'lang': 'KO', 'position': 'upper_left'},

        'ㅂ': {'key_index': "D1", 'lang': 'KO', 'position': 'upper_right'},
        'ㅈ': {'key_index': "D2", 'lang': 'KO', 'position': 'upper_right'},
        'ㄷ': {'key_index': "D3", 'lang': 'KO', 'position': 'upper_right'},
        'ㄱ': {'key_index': "D4", 'lang': 'KO', 'position': 'upper_right'},
        'ㅅ': {'key_index': "D5", 'lang': 'KO', 'position': 'upper_right'},
        'ㅛ': {'key_index': "D6", 'lang': 'KO', 'position': 'upper_right'},
        'ㅕ': {'key_index': "D7", 'lang': 'KO', 'position': 'upper_right'},
        'ㅑ': {'key_index': "D8", 'lang': 'KO', 'position': 'upper_right'},
        'ㅐ': {'key_index': "D9", 'lang': 'KO', 'position': 'upper_right'},
        'ㅔ': {'key_index': "D10", 'lang': 'KO', 'position': 'upper_right'},

        'ㅁ': {'key_index': "C1", 'lang': 'KO', 'position': 'upper_right'},
        'ㄴ': {'key_index': "C2", 'lang': 'KO', 'position': 'upper_right'},
        'ㅇ': {'key_index': "C3", 'lang': 'KO', 'position': 'upper_right'},
        'ㄹ': {'key_index': "C4", 'lang': 'KO', 'position': 'upper_right'},
        'ㅎ': {'key_index': "C5", 'lang': 'KO', 'position': 'upper_right'},
        'ㅗ': {'key_index': "C6", 'lang': 'KO', 'position': 'upper_right'},
        'ㅓ': {'key_index': "C7", 'lang': 'KO', 'position': 'upper_right'},
        'ㅏ': {'key_index': "C8", 'lang': 'KO', 'position': 'upper_right'},
        'ㅣ': {'key_index': "C9", 'lang': 'KO', 'position': 'upper_right'},

        'ㅋ': {'key_index': "B1", 'lang': 'KO', 'position': 'upper_right'},
        'ㅌ': {'key_index': "B2", 'lang': 'KO', 'position': 'upper_right'},
        'ㅊ': {'key_index': "B3", 'lang': 'KO', 'position': 'upper_right'},
        'ㅍ': {'key_index': "B4", 'lang': 'KO', 'position': 'upper_right'},
        'ㅠ': {'key_index': "B5", 'lang': 'KO', 'position': 'upper_right'},
        'ㅜ': {'key_index': "B6", 'lang': 'KO', 'position': 'upper_right'},
        'ㅡ': {'key_index': "B7", 'lang': 'KO', 'position': 'upper_right'},
        }


    # Add attributes based on position
    # Letters positions should end up being {y_start + (y_increment * letter_data["row"] + letter_data["y_pos_adjustment"])}"
    # The adjustor ends up being some amount below the top of the key i.e. a y adjustor of base_size//2 puts the baseline
    # in the middle of the key. Really what I want is

    for letter in dict_of_letter_positions:
        ypos = dict_of_letter_positions[letter]['position'].split("_")[0]
        xpos = dict_of_letter_positions[letter]['position'].split("_")[1]
        key_size = dict_of_keys[dict_of_letter_positions[letter]['key_index']]['size']


        if dict_of_letter_positions[letter]['lang'] == 'EN':
            if ypos == "upper":
                dict_of_letter_positions[letter]['y_pos_adjustment'] = content_padding
                dict_of_letter_positions[letter]['dominant_baseline'] = 'hanging'

            elif ypos == "lower":
                dict_of_letter_positions[letter]['y_pos_adjustment'] = base_key_size - content_padding
                dict_of_letter_positions[letter]['dominant_baseline'] = 'alphabetic'

            if xpos == "left":
                dict_of_letter_positions[letter]['x_pos_adjustment'] = content_padding
                dict_of_letter_positions[letter]['text_anchor'] = 'start'

            elif xpos == "right":
                dict_of_letter_positions[letter]['x_pos_adjustment'] = key_size - content_padding
                dict_of_letter_positions[letter]['text_anchor'] = 'end'

            elif xpos == "xcenter":
                dict_of_letter_positions[letter]['x_pos_adjustment'] = key_size//2
                dict_of_letter_positions[letter]['text_anchor'] = 'middle'

        if dict_of_letter_positions[letter]['lang'] == 'KO':
                if ypos == "upper":
                    dict_of_letter_positions[letter]['y_pos_adjustment'] = content_padding
                    dict_of_letter_positions[letter]['dominant_baseline'] = 'hanging'

                elif ypos == "lower":
                    dict_of_letter_positions[letter]['y_pos_adjustment'] = base_key_size - content_padding
                    dict_of_letter_positions[letter]['dominant_baseline'] = 'alphabetic'

                if xpos == "left":
                    dict_of_letter_positions[letter]['x_pos_adjustment'] = content_padding
                    dict_of_letter_positions[letter]['text_anchor'] = 'start'

                elif xpos == "right":
                    dict_of_letter_positions[letter]['x_pos_adjustment'] = key_size - content_padding
                    dict_of_letter_positions[letter]['text_anchor'] = 'end'

                elif xpos == "xcenter":
                    dict_of_letter_positions[letter]['x_pos_adjustment'] = key_size//2
                    dict_of_letter_positions[letter]['text_anchor'] = 'middle'


    # Text for keys
    for letter in dict_of_letter_positions:

        letter_data = dict_of_letter_positions[letter]
        key_data = dict_of_keys[dict_of_letter_positions[letter]['key_index']]

        keyloc_x = key_data["xloc"]
        keyloc_y = key_data["yloc"]

        svg_lines.append(f'<text x="{ keyloc_x + letter_data["x_pos_adjustment"]}" \
                y="{keyloc_y + letter_data["y_pos_adjustment"]}" \
                class="key-text " \
                dominant-baseline={letter_data["dominant_baseline"]} \
                text-anchor={letter_data["text_anchor"]}>{letter}</text>')
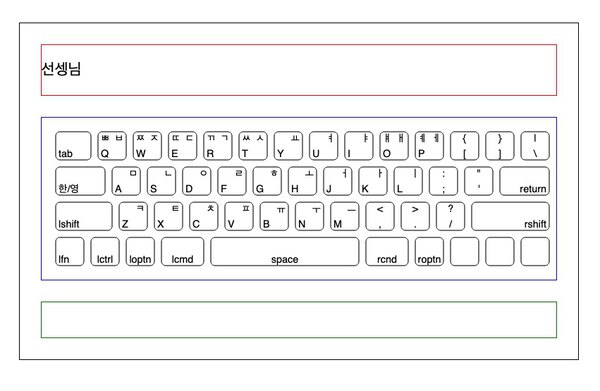
It works!
Before moving forward, I want to refactor the above code a little. There is a lot going on in that one function. I think it would be a bit cleaner to pull some of the functionality out into a few different functions and cut down on some redundancy. At first, I thought the positioning of Korean and English letters was going to have to be pretty different, but letting the browser position everything relating to the baselines worked ok, which means I don’t NEED to keep track of the language (but I’m leaving it in there for now). AND at the same time, I’ll rewrite the container for the letters such that repeats can be used like “shift”, “command”, etc.
The revised code looks like:
from collections import OrderedDict

def build_keyboard():
    svg_lines = []
    base_key_size = 40

    x_start = base_key_size//2
    x_gutter = base_key_size//4
    x_increment = base_key_size + x_gutter
    y_start = base_key_size//2
    y_gutter = base_key_size//4
    y_increment = base_key_size + y_gutter

    corner_rounding = base_key_size // 6
    content_padding = base_key_size//10

    top_letter_row_of_keys = [1.25, 1, 1, 1, 1, 1, 1, 1, 1, 1, 1, 1, 1, 1]
    middle_letter_row_of_keys = [1.75, 1, 1, 1, 1, 1, 1, 1, 1, 1, 1, 1, 1.75]
    bottom_letter_row_of_keys = [2, 1, 1, 1, 1, 1, 1, 1, 1, 1, 1, 2.75]
    bottommost_row_of_keys = [1, 1, 1, 1.5, 5.25, 1.5, 1, 1, 1, 1]


    dict_of_keys = create_key_dict_from_lists(base_key_size, x_start, x_gutter, y_start, y_increment, [bottommost_row_of_keys,
                                                                        bottom_letter_row_of_keys,
                                                                        middle_letter_row_of_keys,
                                                                        top_letter_row_of_keys])

    # Create svg and put squares inside
    svg_lines.append(f'<svg id="keyboard-svg" width="{(x_increment * 14 + x_start*2 - x_gutter)}" '
                     f'height="{(x_increment * 4 + y_start*2 - y_gutter)}" version="1.1" '
                    f'xmlns="http://www.w3.org/2000/svg">')

    for item in dict_of_keys:
        key_key = dict_of_keys[item]

        svg_lines.append(f'<rect class="key" id="key{key_key["row"]}-{key_key["col"]}" '
                    f'x="{key_key["xpos"]}" '
                    f'y="{key_key["ypos"]}" rx="{corner_rounding}" '
                    f'ry="{corner_rounding}" '
                    f'width="{key_key["size"]}" '
                    f'height="{base_key_size}"/>')

    # Create and add letters to the keyboard
    dict_of_letter_positions = create_dict_of_key_characters(dict_of_keys, base_key_size, content_padding)

    # Add letters to keyboard
    for letter in dict_of_letter_positions:

        letter_data = dict_of_letter_positions[letter]

        svg_lines.append(f'<text x="{ letter_data["xpos"]}" \
                y="{letter_data["ypos"]}" \
                class="key-text " \
                dominant-baseline={letter_data["dominant_baseline"]} \
                text-anchor={letter_data["text_anchor"]}>{letter_data["key_marking"]}</text>')


    svg_lines.append('</svg>')

    return "\n".join(svg_lines)


def create_key_dict_from_lists(base_key_width, x_start, x_gutter, y_start, y_increment, list_of_row_lists_of_relative_widths):
    """Creates an OderedDict of key locations from a base_key_width and list
    of lists each containing integers representing the relative width of each key.

    This function handles the mapping of a row-up lettering scheme ("A" is the bottom row)
    "B" is the next row up, etc.) and a top down row numbering scheme that lends itself
    well to programmatically drawing rows on a canvas or as svgs.

    The OrderdDict helps simplify the placement process later by guaranteeing that the
    order of keys starts in the top left corner of the keyboard and progresses left
    to right, top to bottom.

    E.g. calling create_key_dict_from_lists(10, [[1, 1, 1], [1, 2], [3]])
    results in a key map looking like

    "A0": "row": 2, "col": 0, "size": base_key_size * 1, "xpos": 0, "ypos": 2
    "A1": "row": 2, "col": 0, "size": base_key_size * 1, "xpos": 1, "ypos": 2
    "A3": "row": 2, "col": 0, "size": base_key_size * 1, "xpos": 2, "ypos": 2
    "B0": "row": 1, "col": 0, "size": base_key_size * 1, "xpos": 0, "ypos": 1
    "B1": "row": 1, "col": 0, "size": base_key_size * 2, "xpos": 1, "ypos": 1
    "C0": "row": 0, "col": 0, "size": base_key_size * 3, "xpos": 0, "ypos": 0

    which looks something like:

    [    C0    ]
    [B0][  B1  ]
    [A0][A1][A2]

    base_key_width: the width of a square key
    list_of_row_lists_of_relative_widths: a list of lists starting with the bottom most row of keys;
        each item in each list should be a int/float multiplier for the width of the key.

    :returns: dict of keys indexes with properties row, column, and size
    """

    dict_of_keys = OrderedDict()
    for row_index, list_of_relative_widths in enumerate(list_of_row_lists_of_relative_widths[::-1]):
        print(row_index, list_of_relative_widths)
        row_letter = chr(ord('A') + len(list_of_row_lists_of_relative_widths) - row_index - 1)
        for column_index, relative_width in enumerate(list_of_relative_widths):
            key_index = f'{row_letter}{column_index}'
            dict_of_keys[key_index] = {"row": row_index, "col": column_index, "size": (base_key_width * relative_width)}

    # Assign x and y locations based on order of keys
    current_row = -1
    for item in dict_of_keys:
        key_key = dict_of_keys[item]
        if key_key["row"] > current_row:
            x = x_start
            current_row = key_key["row"]

        key_key["xpos"] = x
        key_key["ypos"] = y_start + y_increment * current_row
        x += key_key['size'] + x_gutter

    return dict_of_keys


def create_dict_of_key_characters(dict_of_keys, base_key_size, content_padding):
    """Returns a dict with each item having the following:
        'unique_key_name': key_marking, xpos, ypos, dominant_baseline, text_anchor
    """

    dict_of_letter_positions = {
        'tab': {'key_index': "D0", 'lang': 'EN', 'col': 1, 'row': 0, 'position': 'lower_left'},
        'Q': {'key_index': "D1", 'lang': 'EN', 'position': 'lower_left'},
        'W': {'key_index': "D2", 'lang': 'EN', 'position': 'lower_left'},
        'E': {'key_index': "D3", 'lang': 'EN', 'position': 'lower_left'},
        'R': {'key_index': "D4", 'lang': 'EN', 'position': 'lower_left'},
        'T': {'key_index': "D5", 'lang': 'EN', 'position': 'lower_left'},
        'Y': {'key_index': "D6", 'lang': 'EN', 'position': 'lower_left'},
        'U': {'key_index': "D7", 'lang': 'EN', 'position': 'lower_left'},
        'I': {'key_index': "D8", 'lang': 'EN', 'position': 'lower_left'},
        'O': {'key_index': "D9", 'lang': 'EN', 'position': 'lower_left'},
        'P': {'key_index': "D10", 'lang': 'EN', 'position': 'lower_left'},
        '{': {'key_index': "D11", 'lang': 'EN', 'position': 'upper_center'},
        '[': {'key_index': "D11", 'lang': 'EN', 'position': 'lower_center'},
        '}': {'key_index': "D12", 'lang': 'EN', 'position': 'upper_center'},
        ']': {'key_index': "D12", 'lang': 'EN', 'position': 'lower_center'},
        '\\': {'key_index': "D13", 'lang': 'EN', 'position': 'lower_center'},
        '|': {'key_index': "D13", 'lang': 'EN', 'position': 'upper_center'},

        '한/영': {'key_index': "C0", 'lang': 'EN',  'position': 'lower_left'},
        'A': {'key_index': "C1", 'lang': 'EN', 'position': 'lower_left'},
        'S': {'key_index': "C2", 'lang': 'EN', 'position': 'lower_left'},
        'D': {'key_index': "C3", 'lang': 'EN', 'position': 'lower_left'},
        'F': {'key_index': "C4", 'lang': 'EN', 'position': 'lower_left'},
        'G': {'key_index': "C5", 'lang': 'EN', 'position': 'lower_left'},
        'H': {'key_index': "C6", 'lang': 'EN', 'position': 'lower_left'},
        'J': {'key_index': "C7", 'lang': 'EN', 'position': 'lower_left'},
        'K': {'key_index': "C8", 'lang': 'EN', 'position': 'lower_left'},
        'L': {'key_index': "C9", 'lang': 'EN', 'position': 'lower_left'},
        ';': {'key_index': "C10", 'lang': 'EN', 'position': 'lower_center'},
        ':': {'key_index': "C10", 'lang': 'EN', 'position': 'upper_center'},
        '"': {'key_index': "C11", 'lang': 'EN', 'position': 'upper_center'},
        "'": {'key_index': "C11", 'lang': 'EN', 'position': 'lower_center'},
        "return" : {'key_index': "C12", 'lang': 'EN', 'position': 'lower_right'},

        "lshift": {'key_index': "B0", 'lang': 'EN', 'position': 'lower_left', "display": "shift"},
        'Z': {'key_index': "B1", 'lang': 'EN', 'position': 'lower_left'},
        'X': {'key_index': "B2", 'lang': 'EN', 'position': 'lower_left'},
        'C': {'key_index': "B3", 'lang': 'EN', 'position': 'lower_left'},
        'V': {'key_index': "B4", 'lang': 'EN', 'position': 'lower_left'},
        'B': {'key_index': "B5", 'lang': 'EN', 'position': 'lower_left'},
        'N': {'key_index': "B6", 'lang': 'EN', 'position': 'lower_left'},
        'M': {'key_index': "B7", 'lang': 'EN', 'position': 'lower_left'},
        ',': {'key_index': "B8", 'lang': 'EN', 'position': 'lower_center'},
        '<': {'key_index': "B8", 'lang': 'EN', 'position': 'upper_center'},
        '.': {'key_index': "B9", 'lang': 'EN', 'position': 'lower_center'},
        '>': {'key_index': "B9", 'lang': 'EN', 'position': 'upper_center'},
        '?': {'key_index': "B10", 'lang': 'EN', 'position': 'upper_center'},
        '/': {'key_index': "B10", 'lang': 'EN', 'position': 'lower_center'},
        "rshift": {'key_index': "B11", 'lang': 'EN', 'position': 'lower_right', "display": "shift"},

        "lfn": {'key_index': "A0", 'lang': 'EN', 'position': 'lower_left', "display": "fn"},
        "lctrl": {'key_index': "A1", 'lang': 'EN', 'position': 'lower_center', "display": "ctrl"},
        "loptn": {'key_index': "A2", 'lang': 'EN', 'position': 'lower_center', "display": "optn"},
        "lcmd": {'key_index': "A3", 'lang': 'EN', 'position': 'lower_center', "display": "cmd"},
        "space": {'key_index': "A4", 'lang': 'EN', 'position': 'lower_center'},
        "rcmd": {'key_index': "A5", 'lang': 'EN', 'position': 'lower_center', "display": "cmd"},
        "roptn": {'key_index': "A6", 'lang': 'EN', 'position': 'lower_center', "display": "optn"},

        'ㅃ': {'key_index': "D1", 'lang': 'KO', 'position': 'upper_left'},
        'ㅉ': {'key_index': "D2", 'lang': 'KO', 'position': 'upper_left'},
        'ㄸ': {'key_index': "D3", 'lang': 'KO', 'position': 'upper_left'},
        'ㄲ': {'key_index': "D4", 'lang': 'KO', 'position': 'upper_left'},
        'ㅆ': {'key_index': "D5", 'lang': 'KO', 'position': 'upper_left'},
        'ㅒ': {'key_index': "D9", 'lang': 'KO', 'position': 'upper_left'},
        'ㅖ': {'key_index': "D10", 'lang': 'KO', 'position': 'upper_left'},

        'ㅂ': {'key_index': "D1", 'lang': 'KO', 'position': 'upper_right'},
        'ㅈ': {'key_index': "D2", 'lang': 'KO', 'position': 'upper_right'},
        'ㄷ': {'key_index': "D3", 'lang': 'KO', 'position': 'upper_right'},
        'ㄱ': {'key_index': "D4", 'lang': 'KO', 'position': 'upper_right'},
        'ㅅ': {'key_index': "D5", 'lang': 'KO', 'position': 'upper_right'},
        'ㅛ': {'key_index': "D6", 'lang': 'KO', 'position': 'upper_right'},
        'ㅕ': {'key_index': "D7", 'lang': 'KO', 'position': 'upper_right'},
        'ㅑ': {'key_index': "D8", 'lang': 'KO', 'position': 'upper_right'},
        'ㅐ': {'key_index': "D9", 'lang': 'KO', 'position': 'upper_right'},
        'ㅔ': {'key_index': "D10", 'lang': 'KO', 'position': 'upper_right'},

        'ㅁ': {'key_index': "C1", 'lang': 'KO', 'position': 'upper_right'},
        'ㄴ': {'key_index': "C2", 'lang': 'KO', 'position': 'upper_right'},
        'ㅇ': {'key_index': "C3", 'lang': 'KO', 'position': 'upper_right'},
        'ㄹ': {'key_index': "C4", 'lang': 'KO', 'position': 'upper_right'},
        'ㅎ': {'key_index': "C5", 'lang': 'KO', 'position': 'upper_right'},
        'ㅗ': {'key_index': "C6", 'lang': 'KO', 'position': 'upper_right'},
        'ㅓ': {'key_index': "C7", 'lang': 'KO', 'position': 'upper_right'},
        'ㅏ': {'key_index': "C8", 'lang': 'KO', 'position': 'upper_right'},
        'ㅣ': {'key_index': "C9", 'lang': 'KO', 'position': 'upper_right'},

        'ㅋ': {'key_index': "B1", 'lang': 'KO', 'position': 'upper_right'},
        'ㅌ': {'key_index': "B2", 'lang': 'KO', 'position': 'upper_right'},
        'ㅊ': {'key_index': "B3", 'lang': 'KO', 'position': 'upper_right'},
        'ㅍ': {'key_index': "B4", 'lang': 'KO', 'position': 'upper_right'},
        'ㅠ': {'key_index': "B5", 'lang': 'KO', 'position': 'upper_right'},
        'ㅜ': {'key_index': "B6", 'lang': 'KO', 'position': 'upper_right'},
        'ㅡ': {'key_index': "B7", 'lang': 'KO', 'position': 'upper_right'},
    }

    dict_of_mapped_letters = {}

    for item in dict_of_letter_positions:

        key_marking = dict_of_letter_positions[item].get("display", item)

        marking_ypos = dict_of_letter_positions[item]['position'].split("_")[0]
        marking_xpos = dict_of_letter_positions[item]['position'].split("_")[1]
        key_xpos = dict_of_keys[dict_of_letter_positions[item]['key_index']]['xpos']
        key_ypos = dict_of_keys[dict_of_letter_positions[item]['key_index']]['ypos']
        key_size = dict_of_keys[dict_of_letter_positions[item]['key_index']]['size']

        if marking_ypos == "upper":
            ypos = key_ypos + content_padding
            dominant_baseline = 'hanging'

        elif marking_ypos == "lower":
            ypos = key_ypos + base_key_size - content_padding
            dominant_baseline = 'alphabetic'

        if marking_xpos == "left":
            xpos = key_xpos + content_padding
            text_anchor = 'start'

        elif marking_xpos == "right":
            xpos = key_xpos + key_size - content_padding
            text_anchor = 'end'

        elif marking_xpos == "center":
            xpos = key_xpos + (key_size//2)
            text_anchor = 'middle'

        dict_of_mapped_letters[item] = {'key_marking': key_marking,
                                                    'xpos': xpos,
                                                    'ypos': ypos,
                                                    'dominant_baseline': dominant_baseline,
                                                    'text_anchor': text_anchor}

    return dict_of_mapped_letters
Adding Events on Typing
With the keyboard shapes finished, I want to add add some interactivity. Pressing a key should highlight the key being pressed! To do this, I’ll add two classes to the css (one for active and another for inactive), adjust the key’s starting class, and finally add a bit of javascript to intercept key presses and change the class on key up and key down. To make that happen I added a scripts.js file to the static directory:
File Structure
.
├── static
│   ├── scripts.js
│   └── style.css
├── templates
│   └── app.html
└── app.py
Then I changed the css for key to be specific for pressed and unpressed:
style.css
.key-unpressed {
    stroke: black;
    fill: transparent;
    stroke-width: 1;
}

.key-pressed {
    stroke: black;
    fill: lightblue;
    stroke-width: 1;
}
I’m not going to paste the code here, but in the line of python creating the rect svg elements, I changed the key class to key-unpressed.
Finally, I wrote the following javascript that waits for the page to load, then has specific keys mapped to the key names in the app such that when a key is pressed, its class is changed to the key-pressed class and when unpressed is changed back to the key-unpressed class. Note that here is one of the cases where I’m using the number row identifiers instead of the letter row identifiers.
scripts.js
window.onload = function(){

    document.addEventListener('keydown', pressKey);
    document.addEventListener('keyup', releaseKey);

    const keyMap = {
        'KeyQ': "key0-1",
        'KeyW': "key0-2",
        'KeyE': "key0-3",
        'KeyR': "key0-4",
        'KeyT': "key0-5",
        'KeyY': "key0-6",
        'KeyU': "key0-7",
        'KeyI': "key0-8",
        'KeyO': "key0-9",
        'KeyP': "key0-10",
        'BracketLeft': "key0-11",
        'BracketRight': "key0-12",
        'KeyA': "key1-1",
        'KeyS': "key1-2",
        'KeyD': "key1-3",
        'KeyF': "key1-4",
        'KeyG': "key1-5",
        'KeyH': "key1-6",
        'KeyJ': "key1-7",
        'KeyK': "key1-8",
        'KeyL': "key1-9",
        'Semicolon': "key1-10",
        'Quote': "key1-11",
        'KeyZ': "key2-1",
        'KeyX': "key2-2",
        'KeyC': "key2-3",
        'KeyV': "key2-4",
        'KeyB': "key2-5",
        'KeyN': "key2-6",
        'KeyM': "key2-7",
        'Comma': "key2-8",
        'Period': "key2-9",
        'Slash': "key2-10",
        'ControlLeft': "key3-1",
        'ShiftLeft': "key2-0",
        'ShiftRight': "key2-11",
        'AltLeft': "key3-2",
        'AltRight': "key3-6",
        'Space': "key3-4",
        'Lang1': "key1-0",
        'OSRight': "key3-5",
        'OSLeft': "key3-3",
        'Enter': "key1-12",
        'Backslash': "key0-13",
        'Tab': "key0-0",
    }

    function pressKey(e) {
        if (e.code in keyMap){
            e.preventDefault();
            let keyElement = document.getElementById(keyMap[e.code]);
            keyElement.className.baseVal = "key-pressed"}
    }

    function releaseKey(e){
        if (e.code in keyMap){
            let keyElement = document.getElementById(keyMap[e.code]);
            keyElement.className.baseVal = "key-unpressed"
        }
    }
}
With the keyboard working, it is time to connect the work form the last post to this one. Under the keyboard (in the green box), I want to add the settings I need to make the text appear (number of words, language, letters to use) and a submit button that will call the text generator function and put the text above the keyboard (in the red box). To do that I’ll add a form to the html template that will return the text. Some thoughts floating around in my head as I do this:
- The code for generating text doesn’t need to be a call to the server. It should be written in javascript and run client-side. But that’s a change I’ll make later.
- I’m capturing most of the keys and preventing default actions, so when I put the form in, if I want users to type the letters they want to use, I’ll need to modify the key handler or make a way to turn key capture on and off.
- There are a number of extensions for Flask that can make forms faster like Flask-WTF and Flask-Bootstrap4, but I’m going to opt for writing only what I need to try to keep things simple and have a smaller footprint. Plus, using Flask’s built in form handling will result in a page refresh when hitting the submit button. To solve this, I’ll be using Javascript to intercept the form request, call the Flask endpoint and dynamically update the page.
- How should submission errors be handled? For example, if Korean syllable blocks can’t be generated, what should show up on the page? Should submissions be prevented? Should an error be returned? These are choices to make after the form is in place.
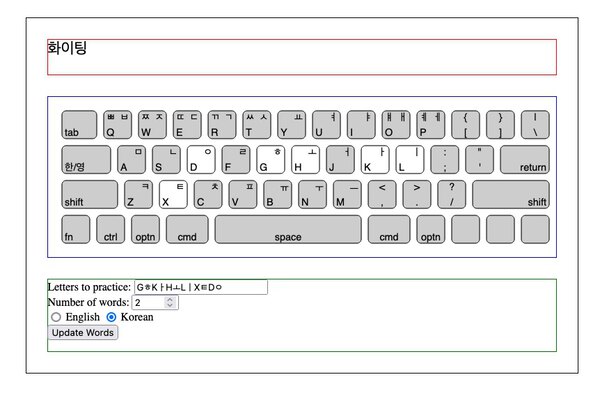
This html sets up the form:
fragment from app.html
<div class="letter-selection">
    <form id="letter-selection-form">
        <div class="form-group">
            <label for="letters">Letters to practice:</label>
            <input type="text" id="letters" name="letters" required size="20">
        </div>
    <div class="form-group">
        <label for="count">Number of words:</label>
        <input type="number" id="count" name="count" required size="4">
    </div>

    <div class="form-group">
        <input type="radio" id="langChoice1"
                name="lang" value="EN">
        <label for="langChoice1">English</label>
        <input type="radio" id="langChoice2"
                name="lang" value="KO">
        <label for="langChoice2">Korean</label>
        </div>
    <button type="submit">Update Words</button>
    </form>
</div>
This javascript that intercepts the submit event and provides code to run when that happens.
fragment from scripts.js
// Event listener for using form submit to change words on page
const letterSelectionForm = document.getElementById('letter-selection-form');
letterSelectionForm.addEventListener('submit', async (e) => {
    e.preventDefault();
    const formData = new FormData(letterSelectionForm).entries()
    const formFeq = Object.fromEntries(formData)
    const response = await fetch(`/text?count=${formFeq.count}&letters=${formFeq.letters}&lang=${formFeq.lang}`)

    // Update words if request comes back ok
    if (response.ok) {
        const resp = await response.text();
        const wta = document.getElementById('word-typing-area')
        wta.textContent = resp
    } else {
        // for now, alert if there is an error
        alert("HTTP-Error: " + response.status);
        }
})
Connecting the Word Generator
Now I can connect word generation text from the previous post with a few changes. The first change is that text_generator.py from the last post is now renamed to generate_text.py and I changed it from a function that was checking for arguments from a Flask request to regular Python that takes arugments. app.py will handle the request and send the data to the python code. The revised app.py is now as follows. Notice that the request handler that was previously in generate_text.py has been pulled out. Another small change in generate_text.py was to check to see if the letters provided are only whitespace and in such a case return a single space.
app.py
from flask import Flask, render_template, request
from keyboard import build_keyboard
from text_generator import get_text
app = Flask(__name__)

@app.route('/')
def main_page():
    keyboard = build_keyboard()
    return render_template("app.html", keyboard=keyboard)

@app.route('/text')
def get_generated_text():

    if request.args:
        # Get arguments and return helpful errors if missing
        args = request.args.to_dict()
        count_of_words_to_return = int(args.get('count'))
        letters_provided = args.get('letters')
        language = args.get('lang')
        output = get_text(count_of_words_to_return, letters_provided, language)
        return output

    else:
        return " "
A Better Way To Choose Letters
This works great except for one problem: users can’t type into the form because the key events are being intercepted! It’s finally time to decide what to do about it. Of all the existing keyboard practice sites, I like keybr the best. It is simple, straight forward, and usable as soon as the page loads. That site uses a technique of having the user click into the typing area to start intercepting key events. In FireFox, using the quote key typically opens quick find. On this site, that only happens when I’ve not clicked into the typing area which means clicking into the typing area starts and stops the key interception. I think that is a pretty elegant solution, but I’m going go try to avoid the problem in the first place.
Instead of letting users type and submit information (which I’d need to check and filter), I’d rather have some other kind of key selection. Keybr.com has a predefined order of letters and allows you to increase or decrease the number of keys being used in a settings menu. I want to add the key selection to the keyboard directly such that the user clicks on the keys they’d like to practice and all other keys out be greyed out. Only the keys marked as active would be used to generate text.
Doing this will require adding css classes for active and inactive keys (both for pressed and unpressed states – a user should be able to see which keys they are pressing no matter what). It also means adding click event handlers in JavaScript that will turn the keys on an off and add and remove those letters from the list of letters shown under the keyboard.
Another thought: If I only add the click listener to the svg squares, it won’t activate when clicking on the letter marking on the keys. That’s not the best UI, so instead I will add an extra transparent svg element over the square and its marking that will have a click event handler.
For now, I’m going to add it in, a little clumsily, by looping through the keys again after letters have been placed and naming the key covers slightly differently from the underlying squares. In a future iteration, I might rewrite the key generator to more closely couple the letters and keys and have tidier SVG output such that the underlying square, the letter, and the key cover are grouped or at least colocated.
This is added just before the end of the keyboard’s closing svg tag:
fragment from keyboard.py
# Create svg covers for each key
for item in dict_of_keys:
    key_key = dict_of_keys[item]

    svg_lines.append(f'<rect class="key-cover" id="key{key_key["row"]}-{key_key["col"]}-cover" '
                f'x="{key_key["xpos"]}" '
                f'y="{key_key["ypos"]}" rx="{corner_rounding}" '
                f'ry="{corner_rounding}" '
                f'width="{key_key["size"]}" '
                f'height="{base_key_size}"/>')
Then the css is updated to add a key-cover class and modify the pressed and unpressed to have active and inactive versions:
fragment from style.css
.key-cover {
    fill: transparent;
}

.key-active-unpressed {
    stroke: black;
    fill: white;
    stroke-width: 1;
}

.key-active-pressed {
    stroke: black;
    fill: lightblue;
    stroke-width: 1;
}

.key-inactive-unpressed {
    stroke: black;
    fill: lightgray;
    stroke-width: 1;
}

.key-inactive-pressed {
    stroke: black;
    fill: lightblue;
    stroke-width: 1;
}
The following additional javascript just changes the color of the key on click and toggles between the active and inactive states:
fragment from scripts.js
// Change key colors on click
function clickKeyToggleActivation(e){

    let keyCover = document.getElementById(e.srcElement.id);
    let keyCoverID = keyCover.id;
    let keyID = keyCoverID.slice(0, keyCoverID.length - 6);
    let keyClass = document.getElementById(keyID).className.baseVal;
    let key = document.getElementById(keyID);

    if (keyClass === "key-active-unpressed"){
        key.className.baseVal = "key-inactive-unpressed";

    } else {
        key.className.baseVal = "key-active-unpressed";
    }
}

// Add click event listener that triggers class toggling
const keySvgs = document.querySelectorAll("rect.key-cover")
for (let i = 0; i < keySvgs.length; i++){
    keySvgs[i].addEventListener('click', clickKeyToggleActivation);
}
The functions for lighting them up also need to be adjusted turn them into the appropriate active or inactive version of pressed and unpressed:
fragment from scripts.js
    function pressKey(e) {
        if (e.code in keyMap){
            e.preventDefault();
            let keyElement = document.getElementById(keyMap[e.code]);
            let keyClassName = keyElement.className.baseVal
            if (keyClassName == "key-active-unpressed"){
                keyElement.className.baseVal = "key-active-pressed";
            } else {
                keyElement.className.baseVal = "key-inactive-pressed";
            }
        }
    }

    function releaseKey(e){
        if (e.code in keyMap){
            let keyElement = document.getElementById(keyMap[e.code]);
            let keyClassName = keyElement.className.baseVal
            if (keyClassName == "key-active-pressed"){
                keyElement.className.baseVal = "key-active-unpressed";
            } else {
                keyElement.className.baseVal = "key-inactive-unpressed";
            }
        }
    }
The last step is to add functionality such that clicking on a key adds or removes those letters from being sent to the generator. For now, I’m going to leave the settings as a form and modify the key click handlers so they both change the color of the key and add and remove characters from the form field. In a future iteration, I will likely make the word generation happen client-side which will remove the need for any kind of server request.
To write this code, I need to be able to click on one square and know which characters would be put into the form field. While I wish that the keys and the characters could be quite independent, I seem to often need to go back and forth between looking up a key based on its character and looking up characters based on a key. For this MVP, I’m going to add one more lookup table in the JavaScript code that should only need to be generated when the page loads. Maybe I’ll come up with a better abstraction in a future version.
I will also modify some of the Python code such that when the characters are being placed onto they keys, I will keep track of which character is on which key, then, when dict_of_keys is used again to create the transparent, clickable svgs, I will add a data attribute to the svg tag. With that, I should be able to use JavaScript to get the characters that should be added to the form when I click a key on the visual keyboard.
Note that this does create an edge case of needing to pay attention to keys that need to be escaped in Python, JS, and HTML. In this case the only immediate changes needed for a working keyboard are the quote characters. In create_dict_of_key_characters, these were updated from ' to ' and " to ". The text generator doesn’t currently include punctuation, but it’s a small change to make for completeness.
The updated JavaScript file that loads after the keyboard has rendered is as follows:
scripts.js
window.onload = function(){

    // Event listeners for intercepting keys and changing virtual keyboard
    document.addEventListener('keydown', pressKey);
    document.addEventListener('keyup', releaseKey);

    const keyMap = {
        'KeyQ': "key0-1",
        'KeyW': "key0-2",
        'KeyE': "key0-3",
        'KeyR': "key0-4",
        'KeyT': "key0-5",
        'KeyY': "key0-6",
        'KeyU': "key0-7",
        'KeyI': "key0-8",
        'KeyO': "key0-9",
        'KeyP': "key0-10",
        'BracketLeft': "key0-11",
        'BracketRight': "key0-12",
        'KeyA': "key1-1",
        'KeyS': "key1-2",
        'KeyD': "key1-3",
        'KeyF': "key1-4",
        'KeyG': "key1-5",
        'KeyH': "key1-6",
        'KeyJ': "key1-7",
        'KeyK': "key1-8",
        'KeyL': "key1-9",
        'Semicolon': "key1-10",
        'Quote': "key1-11",
        'KeyZ': "key2-1",
        'KeyX': "key2-2",
        'KeyC': "key2-3",
        'KeyV': "key2-4",
        'KeyB': "key2-5",
        'KeyN': "key2-6",
        'KeyM': "key2-7",
        'Comma': "key2-8",
        'Period': "key2-9",
        'Slash': "key2-10",
        'ControlLeft': "key3-1",
        'ShiftLeft': "key2-0",
        'ShiftRight': "key2-11",
        'AltLeft': "key3-2",
        'AltRight': "key3-6",
        'Space': "key3-4",
        'Lang1': "key1-0",
        'OSRight': "key3-5",
        'OSLeft': "key3-3",
        'Enter': "key1-12",
        'Backslash': "key0-13",
        'Tab': "key0-0",
    }

    function pressKey(e) {
        if (e.code in keyMap){
            e.preventDefault();
            let keyElement = document.getElementById(keyMap[e.code]);
            let keyClassName = keyElement.className.baseVal
            if (keyClassName == "key-active-unpressed"){
                keyElement.className.baseVal = "key-active-pressed";
            } else {
                keyElement.className.baseVal = "key-inactive-pressed";
            }
        }
    }

    function releaseKey(e){
        if (e.code in keyMap){
            let keyElement = document.getElementById(keyMap[e.code]);
            let keyClassName = keyElement.className.baseVal
            if (keyClassName == "key-active-pressed"){
                keyElement.className.baseVal = "key-active-unpressed";
            } else {
                keyElement.className.baseVal = "key-inactive-unpressed";
            }
        }
    }


    // Event listener for using form submit to change words on page
    const letterSelectionForm = document.getElementById('letter-selection-form');
    letterSelectionForm.addEventListener('submit', async (e) => {
        e.preventDefault();
        const formData = new FormData(letterSelectionForm).entries()
        const formFeq = Object.fromEntries(formData)
        const response = await fetch(`/text?count=${formFeq.count}&letters=${formFeq.letters}&lang=${formFeq.lang}`)

        // Update words if request comes back ok
        if (response.ok) {
            const resp = await response.text();
            const wta = document.getElementById('word-typing-area')
            wta.textContent = resp
        } else {
            // for now, alert if there is an error
            alert("HTTP-Error: " + response.status);
          }
    })


    // On key click, change key colors and add/remove key from form
    function clickKeyToggleActivation(e){

        let keyCover = document.getElementById(e.srcElement.id);
        let markingsOnKey = keyCover.getAttribute("id-markings")

        let keyCoverID = keyCover.id;
        let keyID = keyCoverID.slice(0, keyCoverID.length - 6);
        let keyClass = document.getElementById(keyID).className.baseVal;
        let key = document.getElementById(keyID);


        if (keyClass === "key-active-unpressed"){
            key.className.baseVal = "key-inactive-unpressed";
            removeKeyFromRequestForm(markingsOnKey);
        } else {
            key.className.baseVal = "key-active-unpressed";
            addKeyToRequestForm(markingsOnKey);
        }
    }


    // Add keys in array to form input field
    function addKeyToRequestForm(arrayOfKeys){
        let formLetter = document.getElementById("letters");
        let formLetterContent = formLetter.value

        for (let letter of arrayOfKeys){
            formLetterContent += letter
        }
        formLetter.value = formLetterContent
    }


    // Remove keys in array from form input field
    function removeKeyFromRequestForm(arrayOfKeys){
        let formLetter = document.getElementById("letters");
        let formLetterContent = formLetter.value

        for (let letter of arrayOfKeys){
            formLetterContent = formLetterContent.replaceAll(letter, "")
        }
        formLetter.value = formLetterContent
    }


    // Add click event listener that triggers class toggling
    const keySvgs = document.querySelectorAll("rect.key-cover")
    for (let i = 0; i < keySvgs.length; i++){
        keySvgs[i].addEventListener('click', clickKeyToggleActivation);
    }
}
The final touch is to remove the colored borders and center everything with css:
style.css
.grid-container {
    display: grid;
    justify-items: center
}

.main {
    margin: 40px;
    display: grid;
    justify-items: center;
    min-width: 600px;
    max-width: 1040px;
    /* border: 1px solid black; */
}

.word-typing-area {
    display: grid;
    justify-items: center;
    margin: 30px;
    width: 730px;
    min-height: 50px;
    /* border: 1px solid red; */
    font-size: 22;
}

.keyboard {
    display: grid;
    justify-items: center;
    margin: 30px;
    width: 730px;
    min-height: 50px;
    /* border: 1px solid blue; */
}

.key-cover {
    fill: transparent;
}

.letter-selection {
    display: grid;
    justify-items: center;
    margin: 30px;
    width: 730px;
    min-height: 50px;
    /* border: 1px solid green; */
}

.key-active-unpressed {
    stroke: black;
    fill: white;
    stroke-width: 1;
}

.key-active-pressed {
    stroke: black;
    fill: lightblue;
    stroke-width: 1;
}

.key-inactive-unpressed {
    stroke: black;
    fill: lightgray;
    stroke-width: 1;
}

.key-inactive-pressed {
    stroke: black;
    fill: lightblue;
    stroke-width: 1;
}

.key-text {
    font: normal .9rem sans-serif;
}
That’s it for now! There’s a working word generator and keyboard that lights up when keys are pressed.
My next steps for getting a working MVP that I can used to practice typing are to implement:
- logic to compare what I type to the generated words on the screen
- metrics to keep track of how well I type and which letters I should work on
- some kind of lesson structure / progression (and as part of that changing how random words are generated)
References and Resources
- https://developer.mozilla.org/en-US/docs/Learn/HTML/Howto/Use_data_attributes - archive
- https://python-adv-web-apps.readthedocs.io/en/latest/flask_forms.html - archive
- https://pythonise.com/series/learning-flask/flask-working-with-forms - archive
- https://r12a.github.io/scripts/tutorial/part6 - archive
- https://vanseodesign.com/web-design/svg-text-baseline-alignment - archive
- https://css-tricks.com/snippets/css/complete-guide-grid/ - archive
- http://thenewcode.com/744/Make-SVG-Responsive - archive